BlogsBlog Post

How to Share Posts From the Instagram Feed to Stories

Learn how to easily share posts from your Instagram feed to your Stories with our step-by-step guide.

How to Share Posts From the Instagram Feed to Stories

Are you tired of reposting the same photo on both your Instagram feed and stories? 

Do you want to know how to easily share your favorite posts from your feed to your stories, or learn how to post on Instagram

Look no further, we’ve got you covered! 

In this article, we’ll explain the benefits of sharing feed posts to stories and provide a step-by-step guide to accomplish this.

Understanding Instagram Feed and Stories

Understanding Instagram Feed and Stories

Before we dive into how to share Instagram feed posts to stories, let’s first define what each one is.

What are Instagram Feed Posts?

Your Instagram feed is where all the photos and videos you post show up for your followers to see. It’s a curated collection that represents your personal brand or message. 

Think of your feed as your online portfolio, showcasing your best work and giving your followers a glimpse into your life.

It’s important to keep your feed consistent and visually appealing. 

This means using a consistent color palette, filters, and themes. 

You want your followers to recognize your posts as soon as they see them in their feed.

But don’t be afraid to mix it up! 

Experiment with different types of content, like carousel posts or videos, to keep your feed interesting and engaging.

What are Instagram Stories?

Instagram stories are photos or videos that disappear after 24 hours. 

They are a fun, creative way to showcase personal or behind-the-scenes content that your followers may not see in your feed.

Stories are a great way to connect with your followers on a more personal level. 

You can share behind-the-scenes glimpses into your life or business, showcase new products or services, or even just share your thoughts and feelings with your followers.

One of the great things about stories is the ability to add interactive elements, like polls or questions, to engage with your followers. 

ALSO READ: Instagram Stories: The complete guide for your brand

You can also add filters, stickers, and text to make your stories more visually appealing.

But remember, stories only last for 24 hours, so make sure to create content that is timely and relevant. 

And don’t be afraid to experiment with different types of content, like boomerangs or time-lapse videos, to keep your stories fresh and interesting.

Benefits of Sharing Feed Posts to Stories

Benefits of Sharing Feed Posts to Stories

Now that you understand the difference between feed posts and stories, why should you share your posts to your stories?

Sharing your feed posts to your Instagram story can have a multitude of benefits for your social media strategy. Here are some of the ways it can help:

Increasing Post Visibility

By adding a post to your Instagram story, you increase the visibility of that post beyond your followers’ feeds. 

Your story appears at the top of their Instagram app, which means they are more likely to see it. 

This gives them another opportunity to see your content, which can lead to more engagement and followers.

For example, if you post a photo of a new product on your feed, sharing it to your story can give it an extra boost. 

Your followers who may have missed it in their feed will now see it at the top of their app, increasing the chances of them engaging with it.

Engaging with Your Audience

Sharing a feed post to your story encourages your followers to engage with your content. 

They can respond to your story with direct messages or even repost it to their own story. 

This creates a dialogue with your followers and helps build relationships.

For instance, if you share a behind-the-scenes look at your business on your feed, you can share it to your story and encourage your followers to ask questions or share their own experiences. 

This can help you build a community around your brand and foster a sense of engagement and loyalty.

Promoting User-Generated Content

If someone tags you or your business in a post, sharing it to your story can be a great way to recognize and thank them. 

It also shows other followers that people are talking about you, which can foster a sense of community and loyalty.

For example, if a customer shares a photo of themselves using your product and tags your business, you can share it to your story and thank them for their support. 

This not only shows that you appreciate their business but also encourages others to share their own experiences with your brand.

Hence, sharing your feed posts to your Instagram story can have a positive impact on your social media strategy. 

It can increase visibility, engagement, and promote a sense of community around your brand. So next time you post on your feed, consider sharing it to your story as well.

Step-by-Step Guide to Share Posts From the Instagram Feed to Stories

Share Posts From the Instagram Feed to Stories

Instagram is a popular social media platform that allows you to share photos and videos with your followers. 

One of the great features of Instagram is the ability to share posts from your feed to your stories. 

This is a great way to showcase your favorite posts and share them with your followers. 

In this step-by-step guide, we will show you how to share posts from the Instagram feed to your stories.

Step 1: Find the Post You Want to Share

The first step is to find the post you want to share on your story. Scroll through your Instagram feed until you find the post that you want to share. It can be a photo or a video.

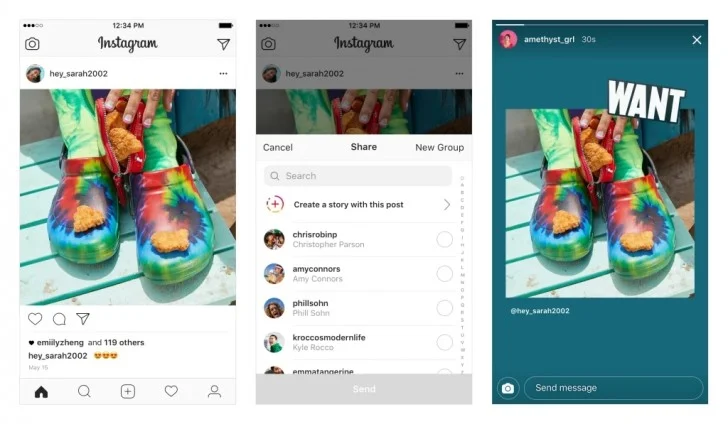
Step 2: Tap the Share Icon

Once you have found the post you want to share, tap the paper airplane icon below the post. This will bring up a menu with different sharing options.

ALSO READ: 6 Ways to Avoid the Instagram Shadowban in 2023

Step 3: Select “Add post to your story”

In the menu that pops up, select “Add post to your story.” This will open up the post in your story editor.

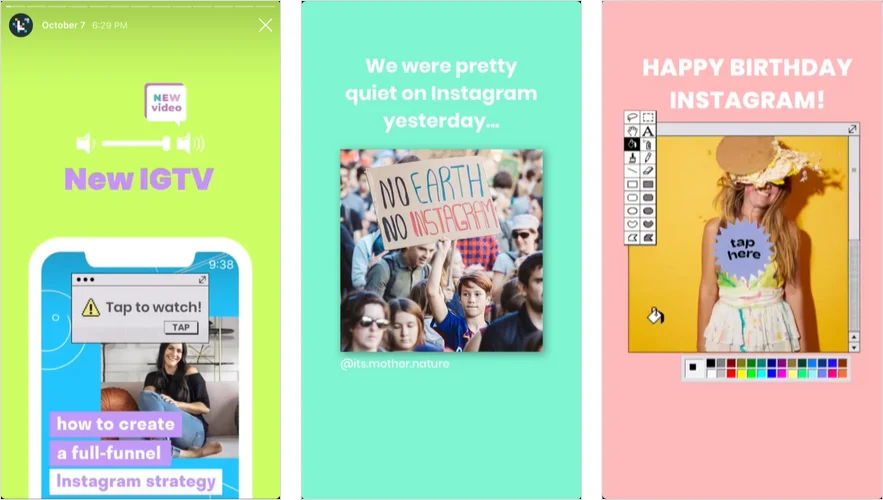
Step 4: Customize Your Story

Now that you have the post in your story editor, you can customize it to your liking. You can add text, stickers, and GIFs to the post to make it more interesting. 

You can also resize the post and move it around on the screen.

Instagram offers a variety of stickers that you can add to your story, such as location stickers, hashtag stickers, and emoji stickers. 

You can also add text to your story by tapping the “Aa” icon at the top of the screen.

Step 5: Share Your Story

When you’re happy with your story, simply click the “Share” button, and the post will be added to your story. 

Your followers will be able to see the post in your story for 24 hours.

Sharing posts from your feed to your stories is a great way to engage with your followers and showcase your favorite posts. 

With these simple steps, you can easily share posts to your stories and add your own personal touch to them.

Tips for Effectively Sharing Feed Posts to Stories

Tips for Effectively Sharing Feed Posts to Stories

Sharing feed posts to stories is a great way to increase engagement and reach on Instagram. 

However, simply reposting a post may not be enough to capture your audience’s attention. 

Here are some tips to make your shared posts more effective:

Add Relevant Hashtags and Location Tags

By adding relevant hashtags and location tags to your story, you increase the chances that users who are not currently following you will see your post. 

This is because Instagram’s algorithm uses these tags to categorize and distribute content to users who are interested in the same topics or locations. 

For example, if you are sharing a post about a new restaurant in town, adding location tags and food-related hashtags can help attract users who are interested in trying new food spots.

Use Stickers and GIFs to Make Your Story More Engaging

Customizing your story with stickers and GIFs makes it more eye-catching and engaging. 

Try adding a poll sticker to your story to encourage your followers to interact with you. 

You can also use a question sticker to prompt your followers to ask you questions related to the post you are sharing. 

This not only increases engagement, but also helps you build a stronger relationship with your followers.

Tag the Original Poster in Your Story

If you are sharing someone else’s post, make sure to tag them in your story. 

This not only recognizes the original poster, but also increases the likelihood that they will repost your story on their own page. 

This can help you reach a wider audience and gain more followers.

Overall, sharing feed posts to stories can be a powerful tool for increasing your reach and engagement on Instagram. 

By following these tips, you can make your shared posts more effective and attract more followers to your page.

Things You Can Face While Sharing Instagram Feed Posts to Stories

Things You Can Face While Sharing Instagram Feed Posts to Stories

Share Someone Else’s Post to My Story

Yes, you can share someone else’s post to your story as long as their account is public and they haven’t turned off the sharing function. 

This is a great way to share content that you find interesting or inspiring with your own followers, and it can also help to increase engagement on the original post.

When you share someone else’s post to your story, you can customize it by adding stickers, text, or other elements to make it your own. 

ALSO READ: How to Use Instagram Stories Highlights to Wow Your Followers

You can also tag the original poster in your story to give them credit and allow your followers to check out their account.

How Long Will the Shared Post Stay In My Story?

The shared post will stay in your story for 24 hours, just like any other story post. 

However, if the original post is deleted or made private before the 24-hour period is up, the shared post will no longer be visible in your story.

It’s also important to note that if the original post is edited after you’ve shared it to your story, those changes will not be reflected in your shared post. 

This is because the shared post is essentially a screenshot of the original post at the time that you shared it.

Can I Share a Post From a Private Account to My Story?

No, you cannot share a post from a private account to your story. 

This is because Instagram respects the privacy settings of individual users, and sharing a private post to your story would violate those settings.

If you want to share content from a private account, you can either ask the original poster for permission to share it or take a screenshot of the post and share it as a regular story post (without tagging the original poster).

Remember, it’s always important to respect other users’ privacy and intellectual property rights when sharing content on Instagram.

FAQs- Here’s More For You!

Q. How to post on Instagram?

To post on Instagram, tap the plus icon at the bottom of the screen, select a photo or video from your library, add a caption and any other desired details, and then tap “Share.”

Q. How to share a post on Instagram?

To share a post on Instagram, tap on the paper airplane icon below the post and select “Share to your story” or “Send to.”

Q. How to put Instagram post on story?

To put an Instagram post on your story, tap on the paper airplane icon below the post and select “Add post to your story.”

Q. Can I edit a post before sharing it to my story on Instagram?

No, you cannot edit a post before sharing it to your story on Instagram. However, you can add text, stickers, and other elements to customize it.

Q. How to share someone’s post to your story?

To share someone’s post to your story on Instagram, tap on the paper airplane icon below the post and select “Add post to your story.”

Q. Can I share Instagram post to story?

No, you cannot share Instagram post to story on Instagram. You can only share it to one story, or share Instagram post to story, at a time.

READ MORE: 9 Ways to Get More Followers on TikTok in 2023

Q. How do I share a video to my story on Instagram?

To share a video to your story on Instagram, tap the plus icon at the bottom of the screen, select a video from your library, add a caption and any other desired details, and then tap “Share.”

Q. Do I need permission to share someone’s post to my story on Instagram?

It is generally a good idea to ask for permission before sharing someone’s post to your story on Instagram. However, it is not required as long as you give credit to the original poster.

Conclusion: Maximizing Your Instagram Engagement with Feed Posts and Stories

By sharing your Instagram feed posts to stories, or learning how to post on Instagram, you can increase your content visibility, engage your audience, and foster a sense of community. 

It’s easy to do and adds another level of creativity to your brand. 

Try it out and see how it can benefit your online presence!

BROUGHT TO YOU BY
Try Feedbird Today
1000+ small businesses trust Feedbird to handle their social media presence for only $99 per month
Get started now
Brought to you by

Try Feedbird Today

1000+ small businesses trust Feedbird to handle their social media presence for only $99 per month

Get started now
Instagram Tips & Resources

4 Best Apps for Editing Your Instagram Reels

May 5, 2023

In the era of Instagram Reels, it's never been more essential to make your content stand out with eye-catching edits, stylish effects, and a touch of creativity.

With so many apps out there promising to elevate your Reels game, it can be overwhelming to choose the best reel editing app for you.

But fear not, we've done the hard work and compiled a list of the 4 best apps for editing your Instagram Reels - each with its distinct strengths and weaknesses.

Why Use Editing Apps for Instagram Reels?

First things first, let's address why using the instagram reel editing app is crucial for every aspiring Instagram Reel master:

Instagram Reels have taken the social media world by storm, and for good reason. They're a fun and engaging way to showcase your creativity, connect with your audience, and even grow your following.

However, with so many users jumping on the Reels bandwagon, it can be challenging to stand out from the crowd.

Enhance Your Reels with Creative Tools

By using editing apps, you can give your Instagram Reels a competitive edge by employing filters, effects, and animations that resonate with your audience.

With a plethora of editing apps available, you can enhance your videos with everything from vintage film effects to futuristic animations.

Experimenting with different styles and effects can help you find your unique visual voice, making your Reels instantly recognizable and memorable.

Save Time and Effort on Editing

It's no secret that editing can be a time-consuming process.

Thankfully, intuitive Instagram Reel editing apps make it easy to splice videos together, trim them down to perfection, and experiment with various styles - all on your smartphone.

With the right app, you can streamline your editing process and create high-quality Reels in a fraction of the time it would take to edit them manually.

This means you can spend less time editing and more time brainstorming new ideas and engaging with your audience.

ALSO READ: The Best Instagram Reel Length for Max Engagement

Stand Out from the Crowd

Let's face it - we all want our Instagram Reels to shine bright like a diamond.

To truly stand out on the crowded Explore page, you'll need an app that lets your videos convey your unique personality, creativity, and style.

By using editing apps, you can add a personal touch to your Reels that sets them apart from the rest. Whether it's adding text overlays, using custom fonts, or incorporating your brand colors, editing apps allow you to make your Reels truly your own.

So, if you're ready to take your Instagram Reels to the next level, it's time to start exploring the world of reel editor apps. With the right tools and a bit of creativity, you can create Reels that captivate your audience and help you grow your following.

1. InShot: All-in-One Instagram Reel Editing App

InShot is a fan favorite among video creators, and for good reason.

With its versatile and user-friendly tools, InShot has quickly ascended the ranks as one of the best editing apps for Instagram Reels.

But what sets InShot apart from other video editing apps? Let's take a closer look at some of its key features.

InShot is an all-in-one video editing app used by many creators worldwide

Key Features of InShot

InShot is packed with a plethora of creative tools, including:

  • Cutting, trimming, and merging videos
  • Adjusting video speed for slow-mo or time-lapse effects
  • Adding filters and stickers to accentuate your style
  • Importing your own music or selecting from InShot's vast library

But that's not all. InShot also allows you to add text, animated emojis, and visual effects to create eye-catching Reels your followers will love.

With so many customization options, the possibilities are endless.

Features of InShot which is used by creators worldwide

And if you're worried about your video's aspect ratio, InShot has you covered. You can easily adjust your video to fit any platform, whether it's Instagram, TikTok, or YouTube.

Pros and Cons of InShot

While InShot's comprehensive features and intuitive design make it a top choice for editing Reels, it does have some downsides:

  • The free version contains watermarks and ads, which can be distracting for viewers. However, you can remove them by upgrading to the pro version.
  • In-app purchases are required for some features, such as removing the watermark or unlocking additional filters and effects. While these purchases can add up, they are a small price to pay for the quality of the final product.

Overall, InShot is a powerful and versatile instagram reels app that can take your Reels to the next level.

Whether you're a seasoned content creator or just starting out, InShot is definitely worth checking out.

2. Adobe Premiere Rush: Professional Editing on the Go

Are you a content creator in need of a powerful video editing tool that you can take with you on the go?

Look no further than Adobe Premiere Rush.

As a trusted brand in the industry, Adobe has designed an app that allows you to bring professional-quality video editing to your fingertips.

Adobe Premiere Rush - video editing app with a hub of amazing features

With Adobe Premiere Rush, you can edit videos on your phone, tablet, or desktop.

This means you can work on your projects no matter where you are, whether you're on the train or in a coffee shop. The app also allows you to add transitions, voiceovers, and audio effects to your videos, giving them a polished and professional feel.

One of the standout features of Adobe Premiere Rush is its ability to make color corrections for a consistent visual style.

This is important for content creators who want their videos to look cohesive and professional.

Additionally, the app gives you access to Adobe Stock for royalty-free content, making it easy to find the perfect footage or images for your project.

Adobe Premiere Rush - a hub of amazing features

The interface of Adobe Premiere Rush is intuitive and streamlined, making it perfect for busy creators who need to edit on the go.

You can quickly and easily navigate the app, saving you time and allowing you to focus on the creative process.

ALSO READ: How to Make a TikTok Video: Everything You Need to Know

Pros and Cons of Adobe Premiere Rush

While Adobe Premiere Rush has an array of impressive features, it does have a few drawbacks to consider before committing to the app.

One potential downside is that there is a steep learning curve for beginners.

If you're new to video editing, it may take some time to get the hang of all the features and tools that Adobe Premiere Rush has to offer.

Another potential drawback is that Adobe Premiere Rush requires a subscription for full access.

While there is a free trial available, you'll need to pay a monthly fee to continue using the app. This may be a dealbreaker for some users who are looking for a more affordable option.

Finally, it's worth noting that some features are missing in Adobe Premiere Rush compared to Premiere Pro. While the app is powerful and versatile, it may not have all the tools you need for more complex projects.

Overall, Adobe Premiere Rush is an excellent choice for content creators who need a powerful video editing tool that they can take with them on the go. With its intuitive interface, impressive features, and access to Adobe Stock, it's a great option for anyone looking to take their video content to the next level.

3. VSCO: Aesthetic Filters and Effects

If you prioritize filters and photo-like effects in your Insta-arsenal, VSCO is a must-try app.

With a touch of vintage charm and a splash of modern sophistication, VSCO sets the stage for a visually compelling Instagram Reel.

VSCO for instagram reels editing/designing

But what sets VSCO apart from other photo editing apps?

For starters, VSCO offers a library of custom filters and effects that are unmatched in both quality and quantity. Whether you're looking for a moody, film-inspired filter or a bright and airy effect, VSCO has you covered.

But VSCO isn't just about filters. The app also gives you full editing control, allowing you to adjust brightness, contrast, saturation, and more. And if you're looking to connect with like-minded creators, VSCO has a discoverability feature that makes it easy to find and follow other users who share your aesthetic.

Key Features of VSCO

VSCO offers a range of features for editing your Reels, including:

  • A vast library of custom filters and effects
  • Full editing control, including brightness, contrast, and saturation adjustments
  • A discoverability feature to connect with like-minded creators
VSCO comes with amazing features for instagram reels editing/designing

But VSCO isn't perfect. While the app is a filter powerhouse, it's not without its limitations. For one, VSCO requires a subscription to unlock all filters and features.

And while the app does offer basic editing tools, it lacks some of the more advanced features that video-specific editing apps provide.

Pros and Cons of VSCO

So, what are the pros and cons of using VSCO for your Reels?

Let's take a closer look:

Pros:

  • The app offers a vast library of custom filters and effects that are unmatched in both quality and quantity.
  • VSCO gives you full editing control, allowing you to adjust brightness, contrast, saturation, and more.
  • The app has a discoverability feature that makes it easy to find and follow other users who share your aesthetic.

Cons:

  • VSCO requires a subscription to unlock all filters and features, which may be a turn-off for some users.
  • The app lacks some of the more advanced editing tools and video-specific features that other editing apps provide.

Overall, VSCO is a powerful tool for creating visually stunning Instagram Reels.

While it may not have all the bells and whistles of other editing apps, its library of custom filters and effects make it a must-try for anyone looking to up their Insta-game.

4. Canva - The Most Known Designing Tool

Canva is a design tool that has been gaining popularity in recent years, thanks to its versatility and user-friendly interface, which makes it a convincing reel editor app for content creators.

Canva for instagram reels editing/designing

It offers a wide range of design templates that can be used across various social media platforms, including Instagram Reels.

With Canva, you can create stunning designs that are sure to grab the attention of your followers.

Key Features of Canva

One of the key features of Canva is its extensive library of templates.

Whether you're looking to create a promotional post, a product showcase, or a simple graphic, Canva has got you covered.

Canva has many interesting features for reels editing/designing

With a range of design elements at your disposal, you can experiment with different styles and layouts until you find the perfect fit for your Reel.

Another great feature of Canva is the ability to add text, icons, stickers, and even GIFs to your designs.

This makes it easy to create engaging and interactive content that your followers will love.

With customizable animations and transitions, you can take your Reels to the next level and really make them stand out from the crowd.

However, if you’re still setting up to start as an instagram creator, check out these amazing Insta Bio ideas here!

Some Cons of Canva

Despite its many creative features, Canva does have a few downsides.

Some of the more advanced tools are locked behind a subscription paywall, which can be frustrating for users who are looking to take their designs to the next level.

Additionally, while Canva is a great instagram reel editing app for basic video editing, it may not be the best choice for users who require more advanced features.

Overall, Canva is a fantastic tool for anyone looking to create eye-catching designs and engaging content for their Instagram Reels.

With its intuitive interface and extensive library of templates, it's easy to get started and create professional-looking content in no time. So why not give it a try and see what you can create?

FAQs – Get More Answers Here!

Q. What is the best reel editing app for those on a budget?

In case of budget constraints, InShot is a great reel editing app as it comes with a plethora of editing features for free.

Q. Are there any free Instagram reel editing apps that you recommend?

We suggest free Instagram reel editing apps like InShot and Canva.

Q. I have an Android phone, what's the best reel editing app for me to use?

If you are an Android user, InShot is an easy-to-use reel editing app that provides a lot of features.

Q. What's the best app to make reels with music for Instagram?

Choose InShot for making Instagram reels with music, as it allows you to add music either from your own music library or their licensed tracks.

Q. Is there a specific Instagram reel editing app that's great for iOS users?

Adobe Premiere Rush is a seamless option for iOS users looking for an Instagram reel editing app as it has advanced editing features and can integrate with other Adobe Creative Cloud apps.

Q. I'm new to making reels, what's the best reel editing app for beginners?

For beginners, VSCO and Canva are great reel editing apps. They have easy-to-use features and templates to create visually-stunning videos.

Also read: Which instagram hashtags can help you viral your reel in 2023?

Q. Do you have favorite Instagram reels app for more advanced reel editors?

Adobe Premiere Rush is a great choice for more advanced reel editors. It has advanced editing features and can integrate with other Adobe Creative Cloud apps.

Conclusion

If you’re looking for best reel editing app, discover these exceptional apps for Instagram Reels editing: InShot, Adobe Premiere Rush, VSCO, and Canva.

Enhance your videos with music, stunning visuals, and options that cater to both beginner and advanced editors. Elevate your Instagram Reels and captivate your audience with engaging content!

Similar posts

Maximize your online presence with our expert social media management resources